Your back is hurting or you want to keep it from hurting, what should you do? Lying there on the couch or in the bed all day isn’t going to be doing you many favors, but there are some motions that you can try to ease and recover from those symptoms. I generally recommend that patients start with between one and four basic exercises to try and get the symptoms under control.
Disclaimer, it is important that you pay attention to what your body is telling you and not push anything beyond your capabilities. There is a difference between pain, stretching, and using your muscles. Try to distinguish between the three so that you can make more progress with your treatment. If you feel a pinching pain, then it is likely that you should try to reduce how far you are moving during these exercises. You can also try starting with a different one first and see if it helps to change the order that you try them. No pain, no gain does not always apply and you are oftentimes better off starting out trying not to force more motion in these exercises through a lot of pain.
Your goal with these exercises is to decrease your symptoms, increase your spinal mobility, and increase your core muscle activation. Also, I know that your back might feel tight after doing these exercises. It’ll be okay. You aren’t used to moving in these directions, at least most people aren’t, and you are also hurting. Whatever you do, try to fight that strong urge to just bend forwards and force those back muscles into an aggressive stretch. You will just be undoing a lot of what you just tried to accomplish. There are other ways that you can stretch those muscles without bending over to touch your toes.

I generally have patients work on four different exercises when they present with low back pain. It takes a thorough evaluation to get to the specific cause of your symptoms, but generally these four exercises can at least get you moving in the right direction. Please go see a medical professional to be evaluated if they are not helping or your symptoms are getting worse.
Hooklying Lumbar Rotation
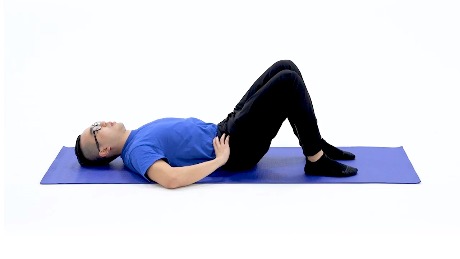
The first exercise that I generally recommend is called a hooklying lumbar rotation. You will lie down on your back with your knees bent and your feet on the ground. This helps to line up your spine and take the stress off of your low back muscles. Once you are there, let your knees roll or drop down to the side for a gentle stretch. I like to rock my knees side to side like a windshield wiper (at a slower speed), but you can certainly hold a longer stretch here as well. This exercise does not need to be anything crazy and you don’t need to force your knees to move through lots of symptoms. You also don’t want your back to come far off the table and arch while you are rotating. Pay attention to your symptoms as you rock your legs side to side. You are looking for any change in symptoms (e.g., better, worse, the same). It is helpful to learn if one side or the other hurts because that would change how you perform the exercise. Generally, you want to drop your knees down to the same side as your original back pain, but that isn’t always the case. Go in for a full evaluation by a physical therapist if this doesn’t work. There are some times when pain is unavoidable or an acceptable thing, but it isn’t that way all of the time and I tend to avoid strong pain with this exercise. It’s better to just do the motion that you can at the time. If that’s just a little bit, then that’s okay. Do just that little bit of motion and see if it gets better. If you can do a lot of motion because you’re feeling pretty good, then fantastic, go for it while you are feeling up to it. The amount of motion that you have could vary from day to day or throughout the day, but the important thing is to listen to your body and do what you’re able to do at the time that you are doing it.
Lie down on back with knees bent and feet on the ground.
Keep your back flat while rotating your legs down to the side.

Open Book Rotation
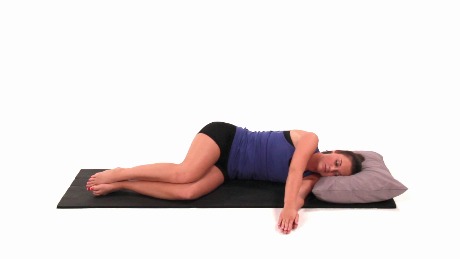
The second exercise that I would recommend is called an open book rotation. You do this one by lying down on your side; I generally recommend lying down on the more painful side first. Then you’ll need to bend your knees, stack your feet, and place your hands in front of you with straight arms. That is your starting and ending position. Take your top arm and raise it up like you are trying to roll over or like you are the cover of a book that is opening. Briefly pause before returning to the starting position once you have rolled over as much as your upper body will allow without letting your legs come off the ground. I like to do repetitions of this first to loosen my spine up and get some blood flowing. Sometimes I will hold this stretch because it generally feels pretty good. The same thing applies with this exercise. Stop before you get to the point that you are feeling too much pain and just perform some smaller movement repetitions to try and get everything loosened up in your back. Adjust or use a pillow if your neck starts hurting and try to relax those muscles. You should turn your head and have your eyes follow your hand as you rotate, but don’t make it into anything too crazy. Your neck should be fairly relaxed for the entire motion. The goal isn’t to be twisted around like a pretzel or to give you neck pain and headaches. You can make this a more aggressive stretch by bringing your top leg forwards as well, but this modification is entirely up to how your symptoms are and how well your back moves. Feel free to do the more advanced progression with the top leg in front if you are feeling good about your symptoms and they are under control.
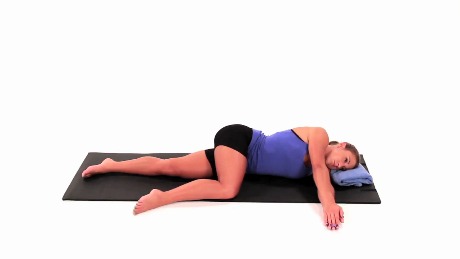
*Beginner or moderate to severe symptoms*
Lie down on your side with knees bent to approximately 90 degrees. and your arms straight out in front of you on the ground together.
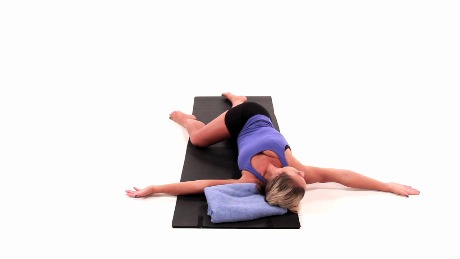
*Beginner or moderate to severe symptoms*
Lift your top arm and rotate your body as if you were rolling over or turning over to place your arm on the ground.
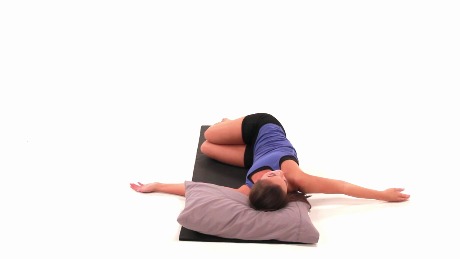
*Advanced or mild to moderate symptoms*
Lie down on your side with your top leg bent to 90 degrees, your bottom leg straight, and your arms straight out in front of you on the ground together.
*Advanced or mild to moderate symptoms*
Lift your top arm and rotate your body as if you were rolling over or turning over to place your arm on the ground.
Prone Press Up
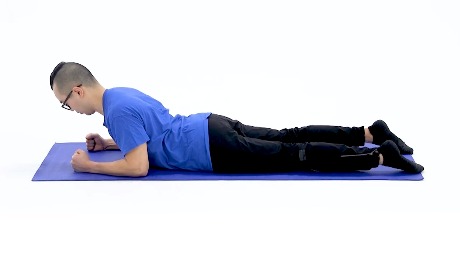
The third exercise is called a prone press up and it involves lying down on your stomach. I know that you don’t want to do this and you think it’s going to hurt more. I am guessing that you probably haven’t gotten into this position in a while, but trust me in that it is going to be good for you to do. Put a pillow under your hips and stomach or under the spot of your back that hurts the most if this position hurts too much. Put another pillow under there if one isn’t enough. The pillow helps to spread out the vertebrae in your back and create a little bit more space for you so that don’t feel as much of a pinch or pain.
Now that you are lying down on your stomach, you will want to come up onto your forearms and pause briefly before dropping back down to lie flat on the ground. How high you go depends entirely on how mobile and flexible your back is and how severe your symptoms are. It is okay if you can’t go up very high at first. Just like the previous exercises, you need to do what you are capable of doing at that moment, which also might vary throughout the day or from day to day. Your goal is to do ten repetitions of that exercise for a few sets and multiple times a day. Feel free to do even more of these if you feel some relief because sometimes it takes a few sets to notice an improvement.
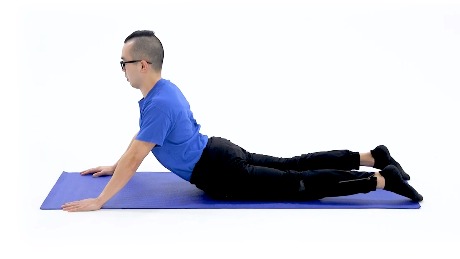
The more advanced version of this exercise involves using your hands like a push-up (upward dog in yoga) to raise you up even higher. You need to keep your hips on the ground if you do this or else you will lose most of the benefit to your back. The advanced prone press up with your hands is even more effective at addressing lumbar disc related back pain as it more strongly encourages your disc to move back into place. Take a break if your arms get tired while doing this because you will end up with even more tightness to your low back muscles if they jump in to try and help your arms. Doing these prone press ups periodically throughout the day is one strategy to keep your arms from getting too tired and it also keeps more balance in the way your back is moving.
You can think of the pillows as training wheels for when you’re very symptomatic, but don’t feel badly about using them because they are there to help. Try removing a pillow when you start getting better until you don’t need one at all. Don’t panic if you feel tight in the muscles of your low back after doing this exercise; that is fairly normal. You aren’t used to moving this way and you might have been in pain when you started. Try to avoid standing up and then bending forwards and undoing a lot of the work that you just did, though. Yes, I know that stretch would feel good on your tight back muscles, but there are better ways to stretch those right now. It’s also important to consider why those muscles are tight. They will tighten up if your arms aren’t doing enough of the work and your back is trying to help out. Try doing fewer repetitions at a time, try putting some pillows under you, or try just coming up onto your forearms (instead of your hands) for the time being. Your other option is to do a few repetitions of the first two exercises again to try and loosen up your back muscles. This is better than an aggressive forward bend.
*Beginner or moderate to severe symptoms*
Lie down on your stomach. Use a pillow(s) under your hips as needed.
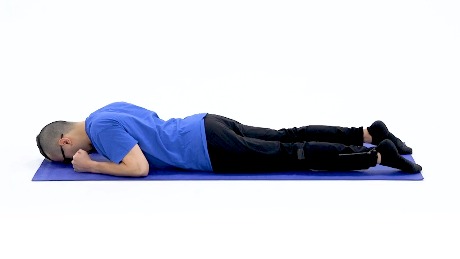
*Beginner or moderate to severe symptoms*
Press up onto your forearms while keeping your back relaxed.
*Advanced or mild to moderate symptoms*
Lie down on your stomach. Use a pillow(s) under your hips as needed.
*Advanced or mild to moderate symptoms*
Press up using your hands while keeping your back relaxed. Try to extend the elbows, but keep the hips on the ground.
Abdominal Bracing
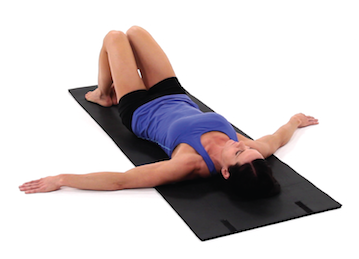
The fourth exercise is called abdominal bracing and it involves working the inner layer of your abdominal core muscles. Very often your core and spinal stabilizing muscles will shut down when you have an abdominal surgery, pregnancy, or back pain. You can think of this situation as being similar to a breaker box. Those muscles don’t often just start back up to normal without you intentionally flipping the switch for them to do so. One way to get this process jump-started again by flipping that switch is to work on abdominal bracing. You can do this while sitting, standing, or lying down. Feel free to do any other position if you want to get creative. You really just need to make sure that your back remains aligned. I generally start patients lying down on their back with their knees bent and their feet on the ground. Here are the steps from there:
- Take a deep breath in.
- Breathe out slowly like you are trying to blow out of your mouth to flicker a candle, but not quite blow it out. You just want to try and flicker the flame.
- At the same time you are blowing out, you need to pull in your stomach like you are trying to put on tight pants or pose at the beach.
Do not do this the opposite way and hold your breath while trying to tighten your core (Valsalva maneuver), that is not a good combination and you need to avoid it. You will build up too much internal pressure holding your breath and it is not safe. The proper steps are to breathe out like you are flickering a candle and pull your core in like you are putting on tight pants. Keep breathing out and slowly flicker that candle until you have no more air left inside. Pull in your core as hard as you can once you have no air left in you and then relax when you need to finally take a breath.
Yes, this definitely involves breathing and coordination to get it to all work well together, but trust me that it is worth the practice. I recommend that everyone work on just this core exercise until it has been mastered before progressing it into something more advanced. There are many, many ways that we can make this much more difficult and challenging, but that is not helpful if you don’t have the basics mastered.
You should feel the muscles tightening all across you front core/stomach and not in your back. You are compensating and pulling too many muscles tight if you feel symptoms in your back. The best way to fix that is to stop, take a break, and try to repeat the exercise with less emphasis on a strong contraction. You need to get all of the steps right to properly activate the muscles to unlock the benefit. A light contraction is a perfectly fine way to start training the muscle if you are still having symptoms because you can always progress later when you’re capable of a stronger and symptom-free contraction.
1.) Lie down on your back with your knees bent and your feet resting on the ground. Place your hands on the bony point on the front of your pelvis and then slide them slightly forwards and inwards off of the bone. You should feel it get softer under your fingers, but then get firm when you are tightening the right muscles.
2.) Take a deep breath in, then a slow breath out while pulling in and tightening your stomach muscles. Do not hold your breath.